What Is WiFi Channel?
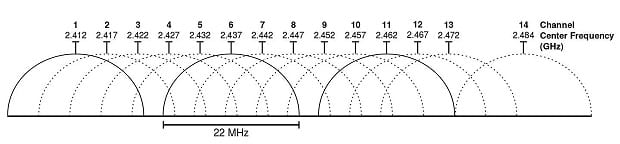
The 802.11 standard for WiFi networks provides several distinct radio frequency ranges for use in WiFi communications, with the 2.4 GHz and 5 GHz bands being used most often. Both of these frequency bands consist of multiple channels.The 2.4 GHz band has a total of fourteen channels, but not all of them are allowed in all countries. In North America, for example, only 11 of the 14 channels can be used. Each channel in the 2.4 GHz band is 22 MHz wide, and there are 5 MHz gaps between the centers of adjacent channels.
This means that all channels except for the channels 1, 6, and 11 (or 2, 7, 12 or 3, 8, 13 or 4, 9, 14, if allowed) overlap.
The situation is a lot better in the 5 GHz band because there’s much more space. The 5 GHz band offers 23 non-overlapping 20 MHz wide channels, as well as several 40 MHz, 80 MHz, and 160 MHz channels.
When two or more WiFi routers are on the same channel, interference may occur and reduce the throughput of the network. Interference may also occur when multiple WiFi routers broadcast on overlapping channels. Ideally, each router in an area should broadcast on a different non-interfering channel, which is only possible with the help of a WiFi channel analyzer tool such as NetSpot.
While WiFi routers have been broadcasting on the 2.4 GHz band since the original version of the 802.11 standard was released in 1997, the 5 GHz band hasn’t seen much in terms of utilization until the release of the 802.11n standard in 2009.
The latest WiFi standard, 802.11ac, supports both the 2.4 GHz and 5 GHz bands, giving users who know how to change WiFi channel an excellent opportunity to achieve higher speeds and greater coverage.
How to Use a WiFi Channel Analyzer?
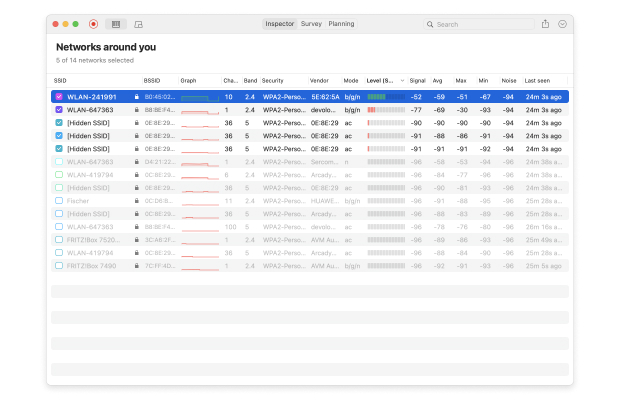
NetSpot is a versatile WiFi site survey, WiFi analysis, and troubleshooting tool for macOS and Windows that can also be used as a WiFi channel analyzer to show WiFi channel overlap. All you need to do is download NetSpot, launch it, and click the Discover button located in the top toolbar.From there, select all available WiFi networks by clicking on the small square button right under the Discover button, highlight the network you would like to analyze, and click Details from the bottom toolbar.
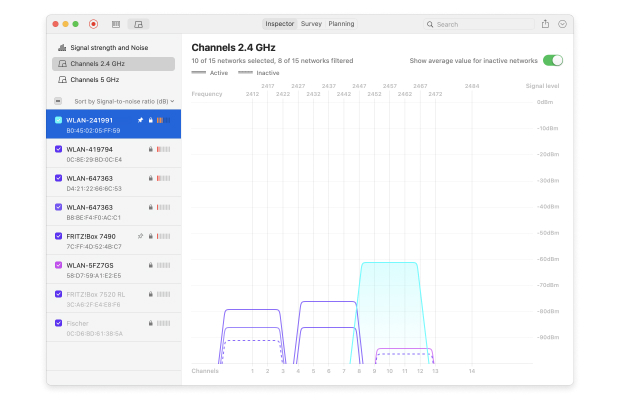
Now, switch to the Channels 2.4 GHz tab and, if you want, tick the “Show average value for inactive networks” option to see even currently inactive networks and their average values. Just by looking at the channel graph displayed by NetSpot, you should be able to instantly tell whether you’re on the best channel for WiFi in your area.

If there are too many other networks broadcasting on the same channel as your network or overlapping with the channel you have currently selected, it’s time for you to change WiFi channel.
Besides helping you understand WiFi channel overlap, you can also use NetSpot to create a comprehensive WiFi coverage heat map with Survey mode. By outlining your real-life WiFi data on a map, you can easily discover all areas of signal weakness and decide if it wouldn’t be better to place your router elsewhere. All the information you gather with NetSpot can be exported in PDF or CSV and used in other applications.

What’s great about NetSpot is that you can download it for free and run it on any macOS or Windows computer with a standard 802.11a/b/g/n/ac wireless network adapter. NetSpot supports 2.4 GHz and 5 GHz frequency bands at 20/40/80/160 MHz channels, making it fully compatible with the latest WiFi standard.
How to Change WiFi Channel?
Even the most basic routers allow you to change WiFi channel. To do so, you first need to log into your router’s admin interface. If you don’t know what your router’s IP address is, open a Command Prompt in Windows and type “ipconfig” without the quotes. Look for “Default Gateway” and copy & paste the address next to it into your browser’s URL bar.You should now see your router’s admin interface and a login prompt asking you to enter the admin password. Unless you’ve changed the default password to something more secure, “admin” should work. If it doesn’t, look for a sticker on your router or contact your internet service provider to help you.
Each router is slightly different, but most routers hide the option to change WiFi channel somewhere in the advanced settings menu. If you can’t find it there, we recommend you open your router’s manual and see if it mentions how to do it. After you’ve changed the channel, launch NetSpot one more time and verify that your router is really broadcasting on the best channel.
Conclusion
Many WiFi issues are caused by the use of a wrong WiFi channel. When multiple networks broadcast on overlapping channels, interference may occur and make what would otherwise be a stable and reliable network unusable.To prevent this from happening, use a WiFi channel analyzer such as NetSpot to identify the best WiFi channel in your area. NetSpot can also help you decide whether the time has come to replace your current router with a newer model, one that supports the latest WiFi standard.